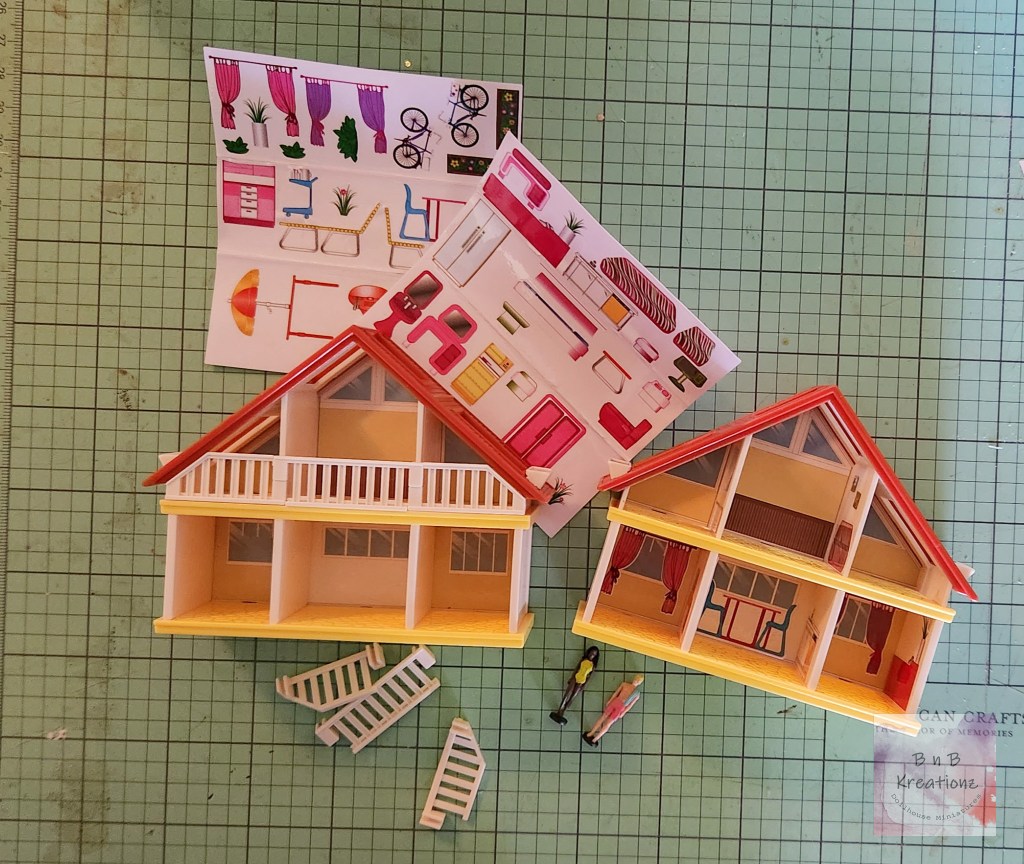
While I was doing some shopping at our local Aldi’s I ran across a World’s Smallest Malibu Barbie House. I decided to pick two up, since they looked to be in scale for a Barbie and Barbie House in 1:12 scale. My though was that if they were I could leave one as is and see how hard it was to customize the other.
Once I got them home, I opened them up to see if my idea would work. The dolls themselves are exactly one inch tall and the dollhouse is four inches long, one and a half inches wide and three and a half inches tall. Which would make a perfect sized fashion doll and fashion doll dollhouse in 1:12 scale. The dollhouse comes with some cute stickers like a fashion doll dollhouse that you can use to decorate the dollhouse if you didn’t want to customize it. From the checklist it appears that the dollhouse comes in the white, yellow, and rust colored house as well as a multiple pink colored house. I was also able to find them for purchase online as well, if you don’t have an Aldi’s near you or yours doesn’t have them. Making this a great mini find.
Now onto the next part, can it be customized easily?
The thin card back easily pops off, which makes it a lot easier to access both the front and back of the dollhouse. I am hopeful that that will make customizing it easier. My plan is to use paint, wallpaper, and fabric to customize the dollhouse. In the coming weeks I am hoping to have it all fixed up and have another blog post about how it goes and how it turned out!!
I’ve built a decent number of dollhouses and room boxes at this point to have experimented with different types of wallpaper that you can use. I personally have used scrapbook paper, dollhouse wallpaper and actual wallpaper. I personally prefer the dollhouse wallpaper, then the actual wallpaper, and lastly the scrapbook paper if I was to rank them.
I’ll start with scrapbook paper first. Pros first, scrapbook paper is easy to obtain since you can get it at many different stores that you can shop at in person or online. It is relatively inexpensive and comes in an unimaginable number of patterns and color combinations and options. The cons, scrapbook paper only comes in squares or standard paper sizes, like 12×12 or 8 1/2×11. This makes you have more seams as well as having to match your pattern more. Another issue I have ran into is that while there are lots of different patterns many of them are on the larger size which can look out of scale in a 1:12 scale scene if that isn’t the look you are going for. Not that you can’t find smaller patterns, but it may be slightly harder to locate but there is fun in the search. Scrapbook paper can also be on the thinner side, and if you pull it to taunt it could rip.
Now for the actual full-sized wallpaper. I will be honest most all of what I have used has been vintage wallpaper that I found in storage or was thrifted. So, I do not know what brands or what type it actually was. I do not think the ones I used had self-adhesive though. I like how wallpaper looks. Most have a slight texture that adds dimension and a more unique look to your dollhouse room or miniature scene. Wallpaper is also slightly thinker than either scrapbook paper or miniature wallpaper, which makes it less likely to rip if you pull it too hard. Some negatives of it that I have found with the wallpaper though is similar to the scrapbook paper the patterns will most likely be on the larger side and it will take a bit of time and effort to find a pattern that might work for your project. Another downside is the size of the wallpaper is its size. It will have to be cut to the size you need no matter what.
Lastly, we have the dollhouse wallpaper. This is one of the most common ways to decorate the walls of your dollhouse. It has many choices of designs and colors to fit your themes available. They come in more manageable sizes, though may still need to be cut. It is available online and at some in person stores, like your local dollhouse stores or some box stores like hobby lobby. I personally prefer my local dollhouse stores between the two in person options because the quality of the papers is usually better and the designs appeal more to me usually. I have used some from both though and they do the job that they are supposed to. I also like ordering from miniatures.com and have always been very happy with all their papers, both the more expensive papers and their wallpaper assortments. A downside to dollhouse wallpaper is that many of the designs that are available can be more in theme for a house in a specific period, and it can be more difficult to find more modern designs, there are some available just not as many.
Another thing I thought of that may help you in your miniature wallpapering endeavors, is my favorite wallpaper paste I have used is the Grandma Stover’s Glue. It adheres nicely with and can be watered down with water to create a nice finish. It also cleans up easily and dries clear.
Those are the three types of wallpaper style wall finishes I have used myself. I hope hearing my opinions help you in creating your own houses.
After I had gotten my first doll house put together and mostly decorated, before I completely changed my mind and redid it all. I had gotten another dollhouse to make, Real Good Toys Victoria’s Farmhouse. It sat unfinished for quite a while because I had initially wanted to kit bash the house and make it almost double in size since I didn’t plan on getting any more after it. That ended up being false and many houses came along, even before the Victoria’s Farmhouse got put together. So, she sat and waited for me to make up my mind on what I wanted to do with her.
I ended but deciding not to totally kit bash her, since my plans where a little lofty for my skill set at that point, and space was at a premium; that much of an expansion of her footprint would have made it very difficult to move and find her a space to live in our own house. So, I opted instead to make little changes like adding a bathroom space and changing the staircases. Little did I know that that would be a bigger endeavor than I realized.
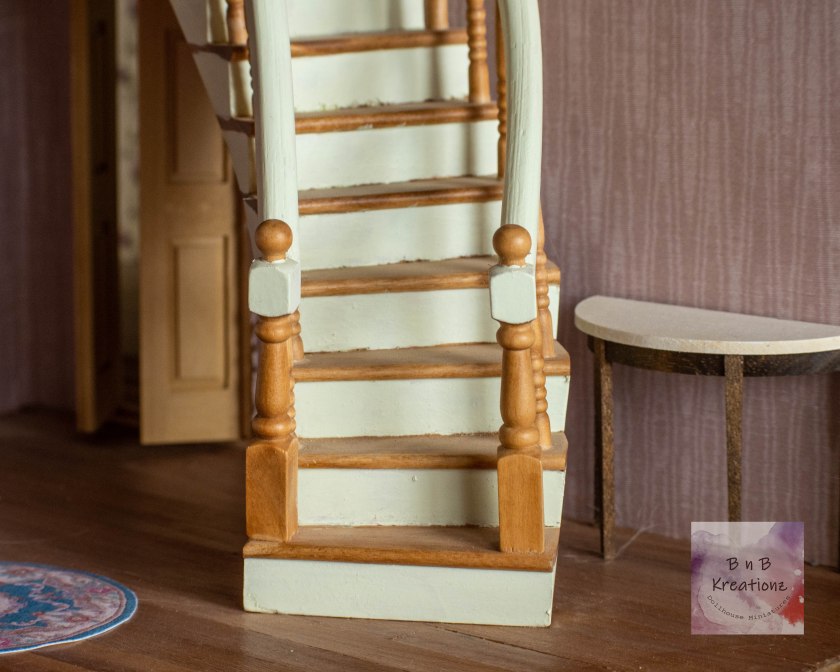
I still wanted to add a spiral staircase, that I had planned on it the beginning of my ideas. I purchased the left swing spiral staircase, and a wider straight wood staircase for the next floor so they looked like they went together. I realized rather quickly that the floor to ceiling height and the stair height where different, but I was determined to put that staircase in the house. To get it to fit, after I had cut the hole for the stairs to go in bigger, I started taking parts off the top of the stairs to try and get them to fit better. I probably should also point out that I wanted to put them in in the middle of the floor plan with no real open concept. Bold, I know!
Somewhere along the journey, with me testing and retesting ideas I had that didn’t work, I came up with my final solution. It was going to end in a hallway space, it seems very anticlimactic but, I didn’t want to completely mess up the stairs themselves beyond repair.
So, with the help of the upstairs stairs, a building square, some extra MDF I had and wood glue, I created a hidden landing and delightful division of the space for the house. I actually am extremely happy with how it turned out, but I totally see now why I have never seen a Victoria’s Farmhouse with the spiral staircase addition.
I hope you enjoy seeing this alteration to this house, and I look forward to sharing more of her as I finish it up, with some more helpful information about different parts of the finish work in the future.
Today I wanted to explain how I made the concrete look outdoor coffee table that we recently added to our shop. It was a relatively simple and fun project so I thought it would be worthwhile to share in case you would like to make your own instead. It also would allow you to make one in a larger size if you wanted one for 1:6 scale or 1:9 scale.
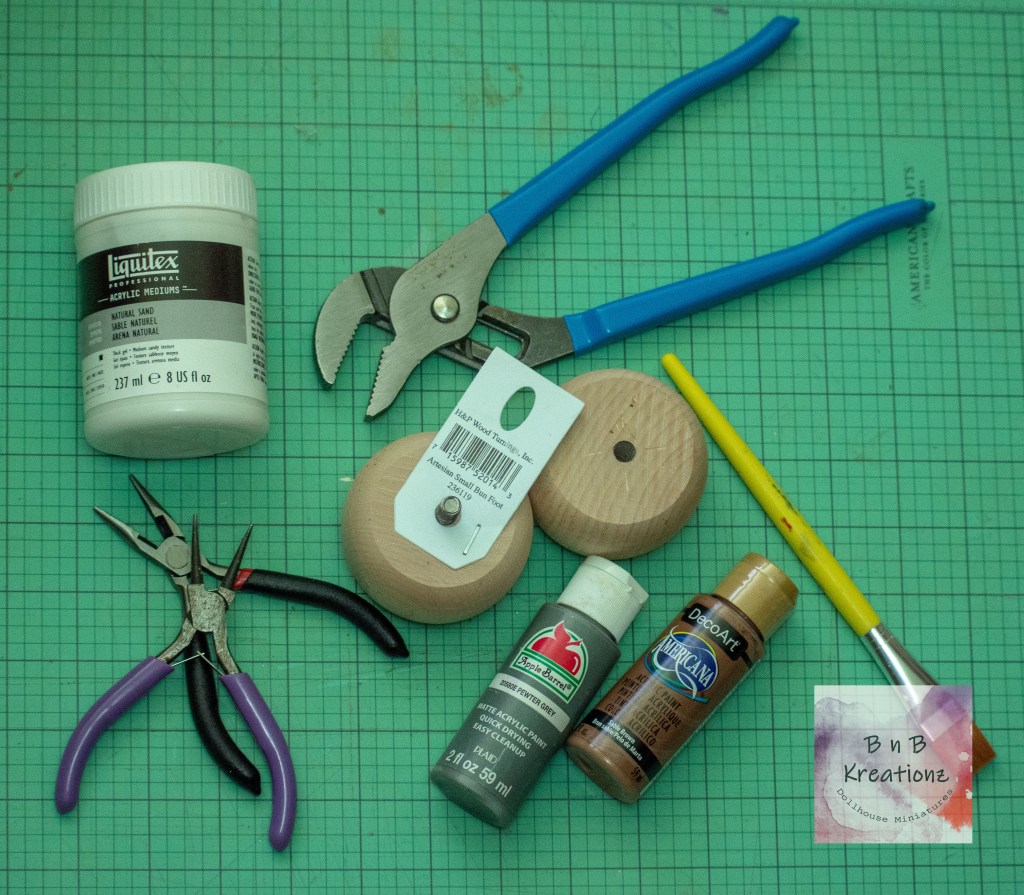
Supplies
Wooden Bun Foot in the size you want
Liquitex Acrylic Medium (Natural Sand Effect)
Paint
Tools
Adjustable Slip-Joint Pliers/ Channel Locks
Needle Nose Pliers
Paintbrushes
400 Grit Sandpaper (not pictured)
Photo of all Supplies and Tools
Nowbefore you go out and purchase all the stuff, I want to be very upfront. It can be difficult to get the screw for attaching the bun foot to furniture out of the wood. It is best to use a pair of channel locks like the ones shown. The flat jaws are much easier to get a grip on the screw than ones that have space for nuts and bolts to fit into. I could do it myself, but it was easier to have my fiancée help me with it. It does require a decent amount of hand and arm strength to break it free. So, it will probably be beneficial to make sure you have someone that can help you if you can’t get ityourself.
To remove the staple you will want to use the needle nose pliers or similar style pliers to get under it and roll it, as if you where making jump rings with it. It gives you the best ability to be able to grasp it and pull it out.
Now once you have the screw out, you can fill the hole if you wish with wood fill, but it is not necessary since the hole will be on the bottom of the table; you will want to take the sandpaper and lightly sand the sides and top till they feel smooth to you. It will probably not take much sanding, but it is easier to work with a smooth surface that to try and cover up and fix a not smooth one.
Once the wood is sanded to your liking, you will want to take the acrylic medium and apply it to the surface. I found it looked the nicest if you applied a moderately thick coat of it so that all the wood was completely covered, and you could not see any of the brown of the wood under the white gray of the medium. You will want to let it completely dry before you touch it again otherwise you will run the chance of knocking the coating off or smudging it. It should take between three and five hours, but I would usually leave them to dry overnight myself, just to be safe.
Make sure to wash your brush thoroughly when you are done applying the acrylic medium, if you don’t get it all the way clean it will get very hard and probably ruin the brush. It is difficult to get the grit out, so I do not recommend using an expensive brush for this step, an inexpensive craft brush would be beneficial.
Once the medium is dry you will want to take the acrylic paint color of your choice and paint the entire piece. I found that two or three coats worked best for me.
At this point the table is done!! If you wanted, you could apply a coat of sealer to protect the paint, but you don’t have to. Though if you intend to use it outside in the elements, I do recommend it to make it last longer.
I hope that you enjoyed this tutorial and that it was helpful in creating a new item for your dollhouse or miniature scene.