Posted in tutorials

Concrete Look Outdoor Coffee Table Tutorial

Today I wanted to explain how I made the concrete look outdoor coffee table that we recently added to our shop. It was a relatively simple and fun project so I thought it would be worthwhile to share in case you would like to make your own instead. It also would allow you to make one in a larger size if you wanted one for 1:6 scale or 1:9 scale.
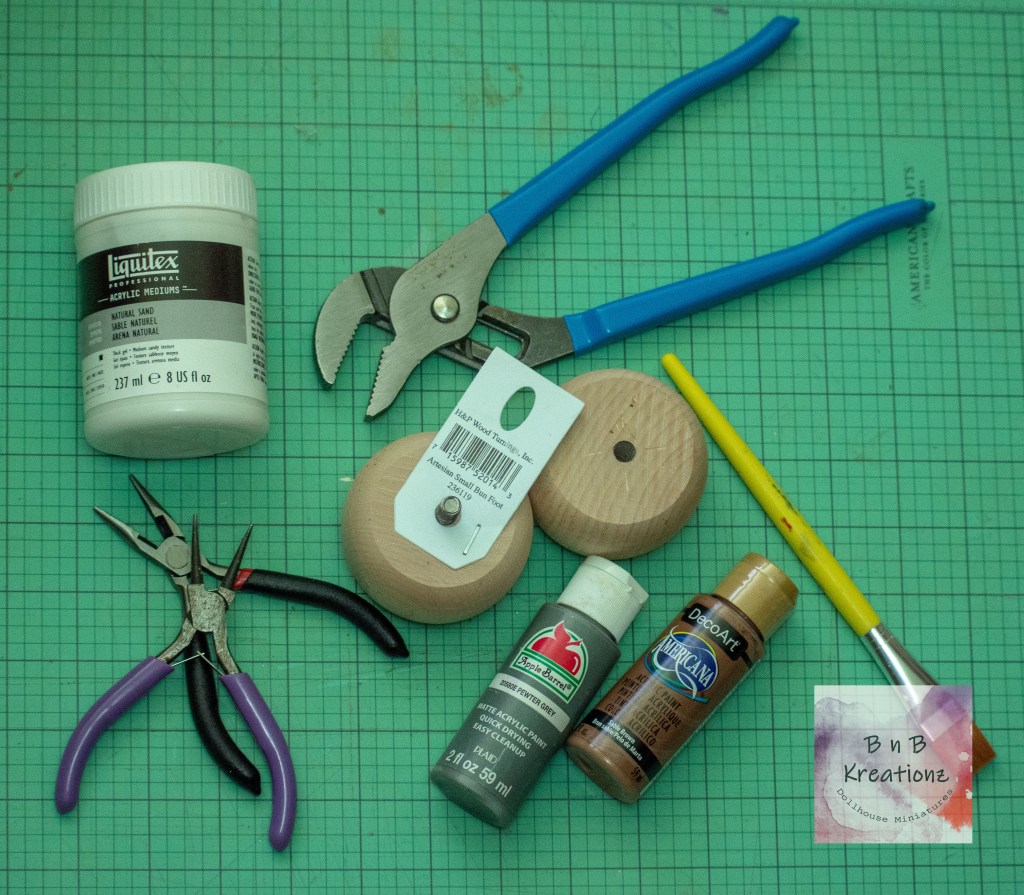
Supplies

  • Wooden Bun Foot in the size you want
  • Liquitex Acrylic Medium (Natural Sand Effect)
  • Paint

Tools

  • Adjustable Slip-Joint Pliers/ Channel Locks
  • Needle Nose Pliers
  • Paintbrushes
  • 400 Grit Sandpaper (not pictured)
Photo of all Supplies and Tools

Now before you go out and purchase all the stuff, I want to be very upfront. It can be difficult to get the screw for attaching the bun foot to furniture out of the wood. It is best to use a pair of channel locks like the ones shown. The flat jaws are much easier to get a grip on the screw than ones that have space for nuts and bolts to fit into. I could do it myself, but it was easier to have my fiancée help me with it. It does require a decent amount of hand and arm strength to break it free. So, it will probably be beneficial to make sure you have someone that can help you if you can’t get it yourself.

To remove the staple you will want to use the needle nose pliers or similar style pliers to get under it and roll it, as if you where making jump rings with it. It gives you the best ability to be able to grasp it and pull it out.

Now once you have the screw out, you can fill the hole if you wish with wood fill, but it is not necessary since the hole will be on the bottom of the table; you will want to take the sandpaper and lightly sand the sides and top till they feel smooth to you. It will probably not take much sanding, but it is easier to work with a smooth surface that to try and cover up and fix a not smooth one.

Once the wood is sanded to your liking, you will want to take the acrylic medium and apply it to the surface. I found it looked the nicest if you applied a moderately thick coat of it so that all the wood was completely covered, and you could not see any of the brown of the wood under the white gray of the medium. You will want to let it completely dry before you touch it again otherwise you will run the chance of knocking the coating off or smudging it. It should take between three and five hours, but I would usually leave them to dry overnight myself, just to be safe.

Make sure to wash your brush thoroughly when you are done applying the acrylic medium, if you don’t get it all the way clean it will get very hard and probably ruin the brush. It is difficult to get the grit out, so I do not recommend using an expensive brush for this step, an inexpensive craft brush would be beneficial.

Once the medium is dry you will want to take the acrylic paint color of your choice and paint the entire piece. I found that two or three coats worked best for me.

At this point the table is done!! If you wanted, you could apply a coat of sealer to protect the paint, but you don’t have to. Though if you intend to use it outside in the elements, I do recommend it to make it last longer.

I hope that you enjoyed this tutorial and that it was helpful in creating a new item for your dollhouse or miniature scene.

Here is the link for the table if you would like to purchase it from our shop!! http://www.etsy.com/listing/1247012972/concrete-outdoor-coffee-table-112-scale

Posted in DIY's & How-To's, tutorials

How To Fold & Organize Your Miniature Fabric Stash

I decided some organization needed to take place for all out fabric. I’m an avid sewer and have always had a huge stash of fabric but it has never overflowed my cabinet where it has been kept.  When I started sewing in miniature our collection erupted!  Every time we went into a craft or fabric store we came home with more.  It seemed we are always finding the perfect cut and even though we only bought a 1/2 yard to 1 yard it began to overflow not only the cabinet but two large rubbermaid totes!  The worst part is we can never find what is wanted for our latest project.

It was decided the clear plastic storage boxes would work the best.  This allows you to see the fabric without having to take it all out. I used a 161/2″L X 13″W X 121/4″H plastic storage box for 1/2 yard and 1 yard cuts of fabric. After trying a couple ways of folding I found the best way to have it fit in the box; six stacks of neatly folded fabric, two rows, which can be seen easily.  Each cut of fabric measures approximately 3 3/4 inch by 41/2 inch.

Here’s how I folded; this worked well up to 1 yard of fabric.  First you make sure your salvages are together with cut ends on each side.blog fabric folding-0597

Fold the piece in half so both cut ends come together.

blog fabric folding-0598

Next you fold the salvages towards  the fold of the fabric.blog fabric folding-0599

At this point you will fold the fabric into thirds.

blog fabric folding-0600blog fabric folding-0603

The last step is to fold the the fabric in half and then in half again.blog fabric folding-0604blog fabric folding-0605


And then you should have something like this.

I found this way of organizing our fabric worked out really well.


~Beth Sighing Off

Posted in DIY's & How-To's, Dollhouses, Sunshine Shop (Three Gables House), tutorials

How To Do A Textured Drywall Wall In Dollhouse Scale

It’s been ages since I’ve gotten a chance to post something to the blog, summertime seems to make everything  get busier. Any who, I finally got a chance to work on our in-progress house, and I wanted to show you how I made the statement wall in it. (Feel free to ask questions if you have them!!)

So on to the tutorial, of how to make a dollhouse textured drywall or plaster wall.

So to do this I used Spackling Compound, you could use something similar like joint compound, but Spackling Compound is lighter in texture so I went with that for the look I was going for.plaster wall bakery-0524

You will also need a putty knife (or something stiff you can wipe off), sandpaper (I used 220), something to create the texture (I used an old wash cloth), paper towels (for clean up), wax paper or something similar (to protect your work surface), some paint primer (to prime and protect the wall and get it ready to add color), and some paint (if you want it colored).

To get started make sure your work surface is protected and get your putty knife and Spackling Compound out. To begin with I applied a thin layer of the compound and just made sure it covered the entire wall and let it dry. I then sanded the wall smooth, do be careful doing this since the dust isn’t real good for you to breath.

plaster wall bakery-0514

Once it was smoothed to my liking, and the dust vacuumed up, I went in applied another coat of the compound. I made it a hair thicker than last time so that the texture had a better chance of showing and imprinting in deeper. So once I had as even a layer as I could get I took the washcloth and started dabbing it on the wet wall till I got a result I liked. Like I said you can use almost anything to texture, it just depends on the look you want it the end. This is the texture of the wash cloth I used if you where curious.

plaster wall bakery-0522

Now I did lightly sand the wall again after I textured to knock of any really high points, and to bring it all together as a whole wall but that is entirely up to the person doing it and how it looks to you. Here it is before I sanded…

plaster wall bakery-0518

Now once its to where you want it to look you go in and add primer to it. The primer will help protect the primer from getting dirty and from moisture, it also will get it ready for painting so it doesn’t “eat” your paint.

Here it is after sanding and primer!!

plaster wall bakery wall-0520.jpg

I really like how it turned out and I hope this tutorial will help you in your own mini adventures!!

~Briana Signing Off

Posted in DIY's & How-To's, tutorials

Tutorial Time: Flamingo Pot

I decided to take the flamingos from Mini-Find Monday and make some beachy yard decor for our mid-century bungalow.  They turned out really cute and where super easy to make!

tutorial flamingo pot-2501

Supplies Needed:

*Plastic flamingo swizler sticks (bought at Target in the party section)

*Small buckets ( bought at Hobby Lobby)

*Small seashells (also bought at Hobby Lobby)

*Sand

*Glue ( I used Aleene’s Tacky Glue)

*Small cup for mixing sand and glue

*wood stirrer for mixing

*Small pliers (for removing bucket handles)

*Hack saw ( for cutting off sticks on flamingos)

*Sharpie or any permanent marker

I first got the flamingos ready by cutting off the excess plastic stick with the hack saw. I did varied heights since I was making three.  The plastic sticks cut easily. I did use a small piece of sand paper to smooth off the rough edge after cutting.

tutorial flamingo pot-2502

I then took the black permanent marker and colored the beaks and eyes.

tutorial flamingo pot-2503

The next step was to take the handles off the buckets.  I used the mini-pliers to bend the handle and it came right off.  Then I bent down the tabs the handle was through to the inside of the bucket. I was able to bend the tabs with my fingers.

tutorial flamingo pot-2505

Mix glue and sand together to desired consistency.

tutorial flamingo pot-2506

Fill buckets with sand mixture and place flamingos in the center and arrange small sea shells around the top of the bucket.

In an hour or less you have a summery decoration for the outside of your dollhouse!!

~Beth, Signing Off